Sand casting is a thousand-year-old craft that is still widely used today. The process of sand casting consists of many individual steps. This blogpost sheds a light on the last part: the operation of molding.
As the name of the process suggests, the decisive element of sand casting is sand. The properties of sand make it possible to design these highly complex castings. However, not every type of sand is equally suitable for sand casting. Among other things, the quartz content should be as high as possible to craft high quality castings.
It all starts in the sand mixer
A sand mixer is an important tool in the process of sand casting. It ensures that the different elements in the sand are in the right proportion to each other. The decisive value here is the flow rate of the sand. It is usually measured at least once every four days and determines the amount of resin and hardener that is added to the sand.
Differences between thick and thin castings
The amount of resin and hardener added to the sand differs depending on the type of casting being cast and is based on the weight of the sand. The amount of resin should always be between 0.8% and 1.2% of the weight of the raw sand. The thicker the desired casting, the more resin is added.
The same applies to the amount of curing agent. Typically, an organic acid – such as P-toluene sulfonic acid or xylene flavic acid – is used in sand casting. Its amount is based on the amount of resin added to the sand. Usually, the amount of curing agent is between 30% and 50% of the amount of resin depending on the temperature of the liquid metal. The higher the temperature of the liquid metal, the less hardener is needed.
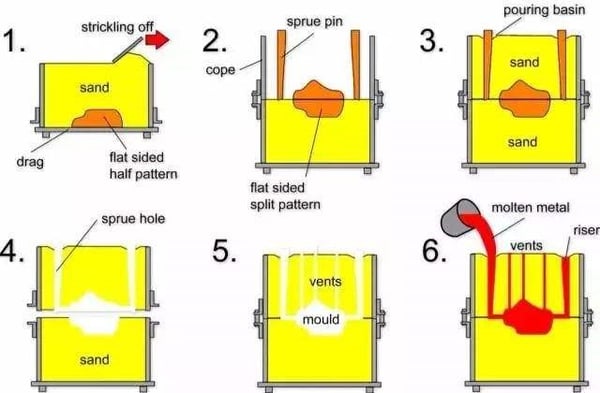
Step-by-step casting instructions
- Once the sand mix has been adapted for the required casting, it is filled into the lower sandbox. For this purpose, the sandbox is placed on the casting slab and the flat-sided half pattern is placed in it. The sand is then filled in and pressed down completely.
- As soon as the molding sand of the lower sandbox is solidified, the sandbox is flipped. Now the upper half of the sandbox is installed together with the second half of the pattern. The feeder and riser are placed as well. Subsequently, the upper sandbox is also filled with sand and pressed on.
- After the sand has solidified, the sandbox is opened again. Both the lower and the upper half of the pattern are removed. The molds for the feeder and riser are also removed. Then the cavity is cleaned, excess sand is removed and the edges are smoothened.
- Now the painting or coating follows. This is an important step in the resin sand molding process. It scientifically improves the surface quality of the castings.
- Before painting, the paint should be stirred and enriched with the appropriate concentration of alcohol. By enriching the paint with alcohol, a drying kiln does not need to be used.
- Make sure that the coating layer is between 0.3 - 0.5 mm. Furthermore, a fast and even brush speed must be ensured to avoid flow and brush marks.
- Everything is now ready for the filling of the liquid metal. The upper sandbox is placed again on the lower one and both are being closed well to ensure that the box is tight.
- Finally, the molten metal is poured into the mold. It is important to control the flow rate. In addition, the escaping gas should be ignited at the parting surface and the air outlet at the same time. When the riser fills up with liquid metal it is a sign to stop pouring.
At AMPCO METAL we have been casting metal for over a century. Since our foundation in 1914, we have perfected the sand casting process, among other things, and today we supply international companies all over the world and in various industries. Since 1914, AMPCO METAL has grown steadily and today has its own companies on 3 different continents and 16 countries.
If you want to dive deeper into the world of copper and copper alloys, download a free extract of our book "Metallurgy of Copper and Copper Alloys". It is a compilation of metallurgical work made on copper and copper alloys that has been produced in collaboration with metallurgy expert Piet Wenschot.